

Swarming is the colony's reproduction mode. Every hive is programmed to swarm. Beekeepers strive to control this age-old mechanism to ensure a better production. Many techniques exist to control swarming. And every beekeeper practices some of them according to his knowledge. He carries out preventive actions, hoping that they will have the desired effect. However in the end, it is the nature that decides on what happens next – without actually informing the beekeeper, by the way!
The good news is that it’s now possible to very precisely know the colony's actions. When we measure its dynamics, we find out unsuspected events and, sometimes, beyond what is written in books. This new information opens up the possibility of a better understanding of the hive and therefore a better swarming control.
Common techniques for swarming control
Most of the techniques used to control swarming involve interventions on the colony. The main factors that encourage a hive to swarm are the lack of space, the age and the race of the queen. The ecosystem and climatic conditions also have an impact.
In beekeeping, we try to influence these key factors. For example, adding suppers or frames increases the volume and the work to be done by the colony. But introducing young queens is also a common practice. A queen of the same year has a 2-3% chance of swarming; this rate rises to 20% for a one-year queen and to 50% for a two-year queen. Another common practice is the royal cell destruction. It requires a significant maintenance and is not necessarily sufficient to prevent swarming if the colony is already engaged in it.
Divisions and artificial swarms are undoubtedly one of the best ways to control colony dynamics. By drastically deflating the colony, this one is bound to rebuild itself and, in this way, will "forget" to reproduce.
Every beekeeper adopts some of these techniques and applies them according to his knowledge and his capabilities. He always hopes that they will have the desired effect, without ever knowing what will really happen. He may suspect a potential swarm during an inspection, but it will rarely go beyond that. This raises the following question: to what extent is it possible to master a technique for preventing a swarm when its criteria can only be measured very roughly?
Precision beekeeping can provide an answer to this question.
Precision beekeeping, the solution to eventually learn how to better control swarming ?
We have been tracking several hives this spring that were equipped with internal and weight sensors. When the swarming period started, we applied the usual procedures against swarming. One of the hives involved in these interventions was the R7 hive.
The R7 hive is a 2019 colony. The queen (marked in green) is just 12 months old. In principle, she should have a 20% average tendency to swarm. However, in the early season, she was already super dynamic, with brood levels exceeding those of her apiary peers.

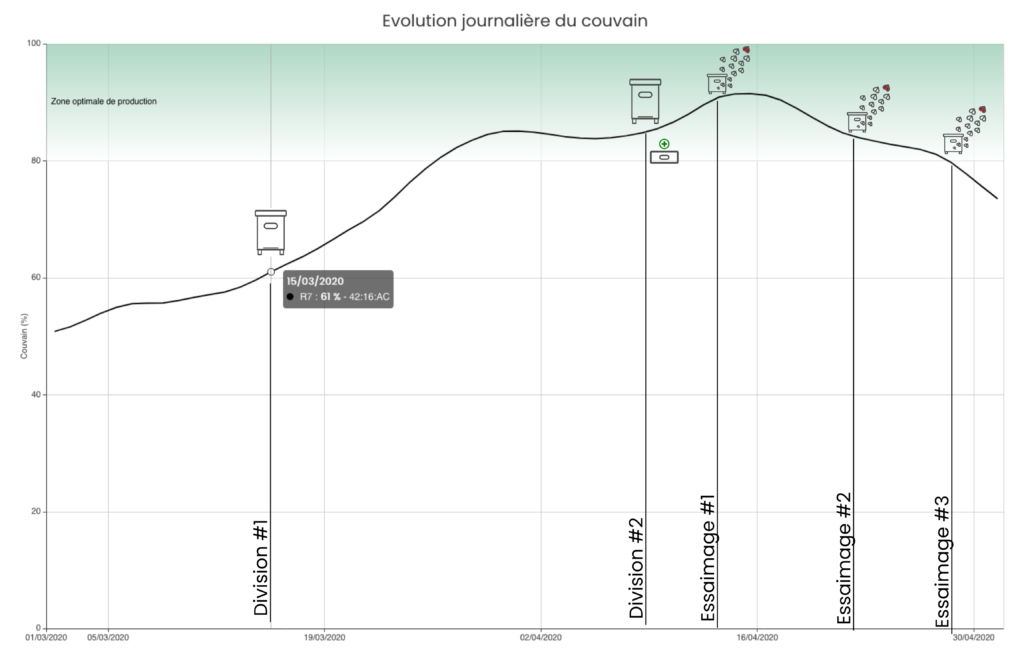
Colony dynamics and swarming chronology - example of behavior with the R7 hive
When the colony reached a 60% brood rate on 15 March, the first division took place. As a result, two beautiful brood frames were collected and put into hives. The objective: to calm its enthusiasm.
On 8 April, the 2nd division started with two new brood frames taken. In addition, during the same inspection, a supper was also added in order to increase the volume. I made the mistake that day of not looking for royal cells in all the frames. Now I know that, in light of the events that followed.
The first swarm took place on April 13. A 3.1 kg swarm of bees left the hive.
First swarm of the R7 hive
During an inspection on April 18, I noticed bees on 4 frames of the supper and the beginning of a nectar entry. The colony was working.
Yes but, on April 23, a second swarm took place!
And on April 28, a third swarm occurred that completely emptied the hive!
There wasn't a single bee left in the supper. The population was really down. The brood returned to the late March stage.
Event summary
This example illustrates to what extent the actions that the beekeeper is carrying out do not always have the expected effects. In the end, we have a hive from which we collected two times two frames and on which we added embossed waxes. It has a one-year old queen, with sufficient space – with this hindsight, the supper should have been installed a few weeks before, regardless of the divisions. Despite all our interventions, the colony has swarmed not once, but three times.

Swarming control with data - Lessons learned
Without the measurements, the beekeeper would never have known that his hive swarmed three times in less than 15 days. That's the interesting part of this experiment. At best, his reflection would have been reduced to a simple "it must have swarmed!".
He would never have come to these two conclusions: "I should have put the supper earlier" and because of the very high brood volume at the beginning of April (when it rained very often), "I should have searched for royal cells".
Thanks to the detailed information about these events, the beekeeper can perceive the "mistakes" that have been made – as well as his axes of improvement. As Lord Kelvin said, "when you can measure what you are speaking about, and express it in numbers, you know something about it".
This experience and those carried out elsewhere make it possible to define some practical uses:
- Systematically divide the hives that reach a 60% level of brood.
- Follow the hives of the apiary as a whole. Compare their respective dynamics and be careful about those that "over-perform". They may "under-perform" at the end!
- After the first division, if the hive does not show a % decrease in its brood quantity, it can be divided a second time.
But let's be humble. Despite following this advice, nature may decide otherwise. When none of this is enough to control the swarm, there is still Plan B: catch the swarm.
Monitoring techniques applied to swarming detection
A hive equipped with a scale makes it possible to visualize the swarms on the weight curves. This is the case for the R7 hive which has a BroodMinder Scale. Each swarm is perfectly identifiable.

But the measurements illustrating this article did not come from the scale. In this case, we should consider equipping all the hives with an electronic scale, which is not viable. In this article, it is the hive's internal sensors – BroodMinder internal hive monitor – combined with BroodMinder's BSwarm algorithm that provide this information. These small internal sensors, which measure temperature, are in most cases sufficient to identify the swarm.

Indeed, when the colony swarms, it stops regulating its temperature. This variation is detectable and makes it possible to identify the event.
The advantage of this type of sensor is that it is much more affordable than a scale. Moreover, it is also this sensor that provides the information to calculate the brood volume of the colony, using another algorithm called BForce…
T2-SwarmMinder, a tool finally available for swarming control!
Which beekeeper hasn't dreamed of knowing when a hive is swarming? Even better, detecting the first signs of it two or three days before? This is now an accessible dream! This spring BroodMinder unveiled the new T2-SwarmMinder. It is a "classic" T2 sensor but with a new firmware. It includes an algorithm to detect swarms and more precisely "temperature events". Indeed, during its development that started in spring 2019, we discovered that it can detect several types of events...
See more in the next post!
